Hole in the Wall
Contributed by Mal T Jones
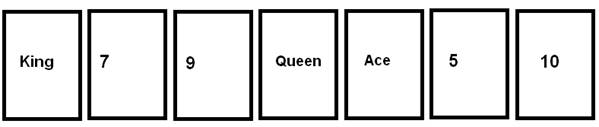
Use a standard 52 card pack. This is a game for two to four players. The aim is to construct a flat “wall of cards” on the playing surface; the wall will be restricted to seven columns wide but can be of any height; see illustrations. Ace is low (1) and Jack is 11, Queen 12 and King 13. The dealer takes cards from the top of a shuffled pack to create the “base of the wall” using seven different numbered or ranked cards. The dealer then deals four cards to each player. The player to the left of the dealer starts play.
Starting the game: see illustration below showing an example of a starting row of a display or wall (the "base of the wall"). For the setup of the base row no two cards must be of the same rank or value; this restriction does not apply to other rows formed later.
Rules of the game: Basics. Each player in turn should have the opportunity to be dealer.
- A player should begin each turn holding four cards if possible. If the player has fewer than four cards, the hand is replenished to four by drawing cards from the stock. If there are insufficient cards in the stock, the player takes whatever cards remain in the stock.
- In a turn of play one or more cards may be added to the display.
- Cards are placed horizontally and / or vertically adjacent to each other in a turn of play along rows and columns - see diagram 2. Diagonal placement is not allowed.
- The cards that are placed in a turn of play consist of one or more "sequences". The first card of a sequence must be played next to a card on the display that is one higher or lower in value. Within any sequence played in one turn, the card values must be consecutive and must all ascend (going up) or all descend (going down).
Example: a sequence from “base card 7” above could start with an 8, or a 6 as both numbers are consecutive to 7; if the sequence begins with 8 it can ascend 8, 9, 10 or descend 8, 7, 6,...; if it begins with 6 it can ascend 6, 7, 8... or descend 6, 5, 4, 3. Sequences such as 8, 7, 8, 9, 8, or 6, 7, 8, 7, 6, where the values both ascend and descend, are not allowed. See diagram 3 for possibilities of placement. - More than one sequence may be placed by a player in a single turn e.g. two cards are used on one part of the display, the remaining cards elsewhere. A player may choose to place one card or several depending on opportunities available to them. Other sequences of cards placed in a turn of play do not have to follow the same pattern as previous ones; so if a set of cards ascends another could descend etc. However, each sequence played has to start from a card that was already on the layout from a previous turn of play.
- Cards of the same number or rank are not allowed to be vertically or horizontally adjacent to each other. They may be diagonally adjacent or in a position further away along a row or column - see diagrams.
- A new sequence of cards placed in a turn of play does not have to match consecutively with cards already placed on the display either from previous turns of play or previous sequences played in the current turn, but when the cards do match, more points are scored. See illustration 2 for clarification.
- At the start of a turn, after receiving replacement cards to bring the hand up to four cards, a player may choose to exchange any number of cards from hand for an equal number of replacement cards drawn from the stock of undealt cards rather than place cards on the display. The discarded cards are added face down to the bottom of the stock pile.
- A card may not be removed from the display once it is placed in position.
Scoring: The player or team with the highest score wins. Points are scored as follows.
- One point for placing a card in consecutive sequence (adjacent in rank) next to another but where it is a different colour, e.g. a 9 of hearts is placed adjacent to a 10 of clubs.
- Two points if the card is the same colour but different suit, 7 of spades placed against 6 of clubs.
- Four points where the card is the same suit, Jack (11) of diamonds placed against 10 of diamonds.
Note: Any legally played card will score for being placed next to a card, and may score further points by being placed next to other consecutive cards already present in the layout. See illustration 2 for clarification.
Final stages: The wall can be continued to be built up from the “base” until no appropriate cards can be placed or the stock becomes depleted. At this end stage if a player says they cannot take a turn they must place their cards face up in front of them, enabling scrutiny by others; if the stock has cards enabling exchanges to be made the player should exchange one or more cards. When it is obvious that no more cards can be placed the game is completed.
Holes in the Wall: These are vacant spaces at the side edges or in the central area created at points above the base of the wall but not open to the space beyond the top row of cards. Once a “hole” is formed no card can be played within it. Each “hole” in the wall at the end of the game counts as points for the dealer or dealer’s partnership; please see the illustration 2. In a hole in the wall at the side of the display each card-sized space counts 5 points, in an enclosed hole each space counts 10 points.
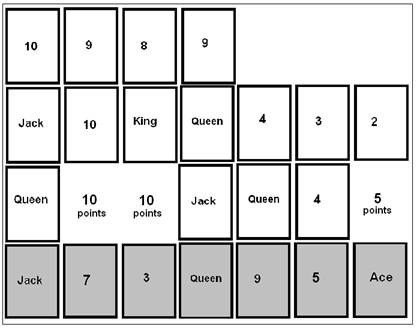 |
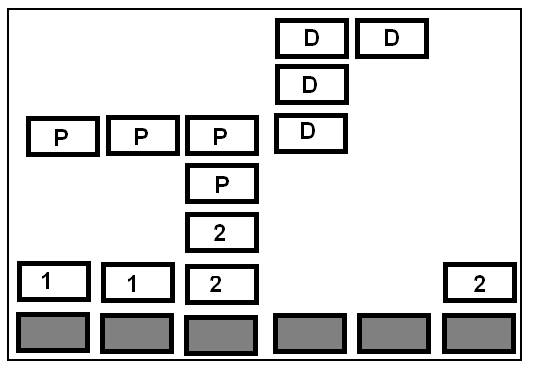
Illustration 2: An example of the opening moves of a game The base row is in grey; four rows have been developed so far. The first player used all their cards by placing a Queen against the Jack in column one then added the Jack and 10 in a descending line; then continued the move by placing the 4 above the 5 (row two, column six) and the 3 above the 4. Notice the base Queen in column four; the Jack was added by the second player and Queen placed above. A third player places a different Queen adjacent and to the right of the Jack (row two, column five). Because it is a different turn of play the Queen does not have to match with the 4’s. The fourth player placed the 10 alongside the Jack in column one then 9 above it and 8 to the right. Multiple scores: Notice the 9 placed between the two 10 cards and the 8: if placed in between these three cards in a turn of play it would score three times; once for the 10 on the left, once for the 10 below it and once for the 8. Note: so far there is one enclosed hole of size 2 (20 points) and one single spaced side hole (5 points). |
Team Games: partners may sit next to each other; this will enable the second team member to use their own cards to finish moves set up by the first player.
Illustrations 3 a, b, c, d, e, show alternative ways of playing the same cards Queen, Jack 10, 4 and 3 in the first turn.
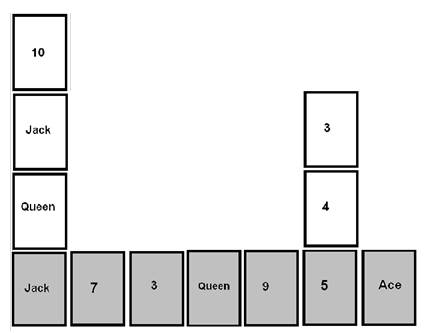 |
Illustration 3 a The queen was placed next to the Jack as it is consecutive in value; the turn of play continued with a descending sequence Jack then 10. The 4 with 3 above complete the turn of play leaving one card in hand. The player replenished the hand before their next turn. The Queen can be placed next to the Jack as its value of 12 one more than the jack 11. The chain of cards in this play is descending 12, 11, and 10. The 4 naturally descends from the base card 5. |
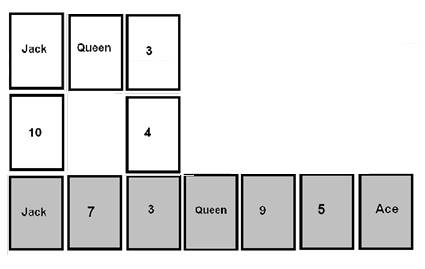 |
Illustration 3 b An alternative ways of playing the same cards. Here the 10 naturally descends from the Jack. Notice the Queen has been placed to the right of the Jack. The base row 3 is extended with the 4; the player then created a descending sequence by placing the 3. |
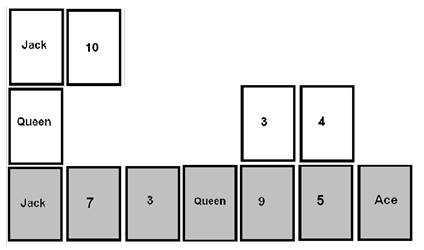 |
Illustration 3 c There are many options. Here the Queen, value (12), starts the turn placed against the Jack (11). The player then creates a descending numerical sequence. The 4 and 3 complete the turn. |
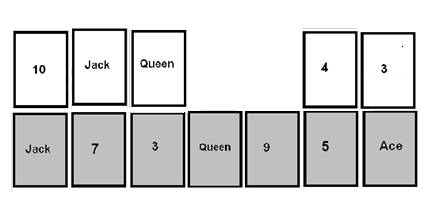 |
Illustration 3 d |
 |
Illustration 3 e |
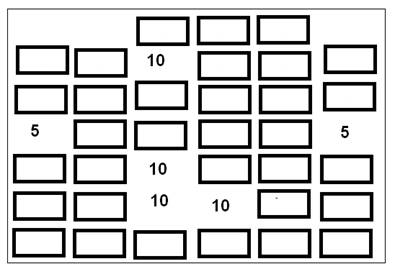 |
Illustration 4 shows examples of enclosed and open spaces with the wall; with the dealer having secured 50 points. Note the wall cannot be more than seven columns wide at any point. The base of wall is at the bottom. The wall is partially built to level seven; if this were a finished game the open spaces above row seven would not score points. Only spaces at the side of the wall and enclosed spaces count. |
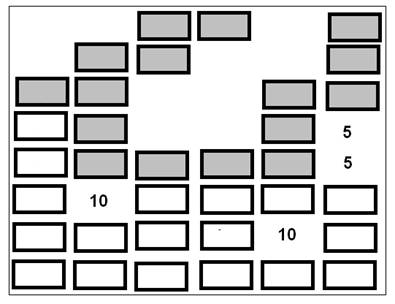 |
Illustration 5 displays a wall with three “holes” and built to row six; the base is at bottom. A dealer in this instance would have a score of 30. Holes can be regular or irregular shapes and may travel along an edge. Notice here the wall has been built with three cards at level eight but a large area in the middle is vacant of cards; In this scenario players were unable to place cards as no suitable ones were available. Cards needed to extend the sequences in grey have already been used earlier on in the game. |
 |
Two extraordinary game scenarios: Despite team A ( players 1 and 2) starting cautiously a very fortunate set of cards in the hands of the dealer’s partnership took only one turn to reach level 8 potentially closing out their opponents from the game as it should be easier for them to create spaces (holes) on the board. Team A will need to make sure the open spaces are filled in. |
 |
A scenario where an early rush by the opening team to stop the dealer’s partnership from gaining holes on the left and right has been disastrous with 100 points on display. |
 |
Illustration of an actual game in progress The image shows a four player game. The base of wall is at the bottom; column one is on the left. The dealer’s partnership has secured 50 additional points so far. Seven rows or levels are partly formed. The dealer’s first and second turns of play enabled the partnership to create three holes in the wall. There are three enclosed “holes” or spaces and two are open on the right side of the display in rows two and four of column 7 (King at base). |